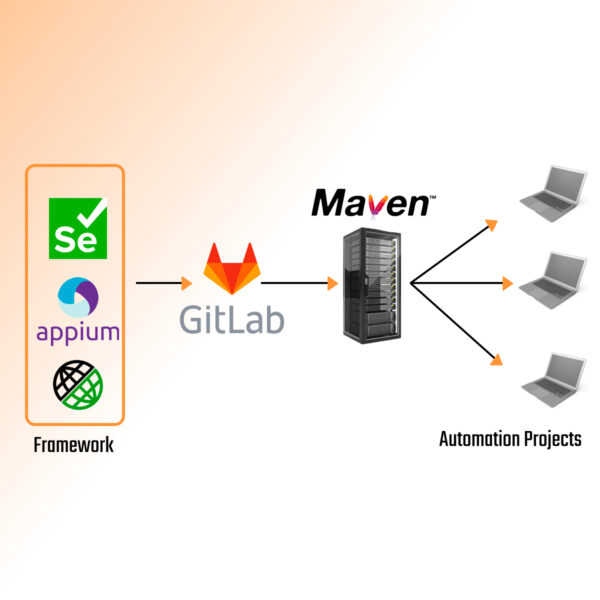
When you create a selenium automation framework, the primary challenge you want to address as a test architect is how can I distribute the framework to various projects/clients effortlessly. You may also want to ensure that various versions of the framework can be accessed based on the need.
Nexus, Jfrog are some of the tools which help you to create and distribute your maven repository, but you may need to have your own server/domain to distribute those privately. The good news is, if your framework codebase is hosted on Gitlab, then you neither need to rely on any third-party tool nor need to have a dedicated server for distributing your code securely. Let me walk you through step by step how to deploy your Java-based Selenium framework Maven repository into Gitlab and distribute.
Creating and distributing framework as a maven dependency
Git lab says, to create a maven repo you need to have the below:
Java 11.0.5+Maven 3.6+
The first step is to create a simple Maven project using your IDE. Once you have created the automation project, ensure that your POM.xml file has the below structure
<groupId>com.tmavens</groupId>
<artifactId>UiFramework</artifactId>
<version>1.0-SNAPSHOT</version>
The next step is to add repositories and distribution management tags. You can give any value for the id in the repository tag, but something meaningful is preferred. The URL should be as shown below where the MY_PROJECT_ID value needs to be replaced with your GitLab project id (a numeric value which you can get by going to Project Information in Gitlab).
<repositories>
    <repository>
        <id>gitlab-myframework-dependency</id>
        <url>https://gitlab.com/api/v4/projects/MY_PROJECT_ID/packages/maven</url>
    </repository>
</repositories>
<distributionManagement>
    <repository>
        <id>gitlab-myframework-dependency </id>
        <url>https://gitlab.com/api/v4/projects/MY_PROJECT_ID /packages/maven</url>
    </repository>
    <snapshotRepository>
        <id>gitlab-myframework-dependency</id>
        <url>https://gitlab.com/api/v4/projects/MY_PROJECT_ID /packages/maven</url>
    </snapshotRepository>
</distributionManagement>
The build section contains the necessary maven information where you can mention the java compiler version, encoding standards and can instruct the maven if you want to create a test-jar or not.
<build>
    <plugins>
        <plugin>
            <groupId>org.apache.maven.plugins</groupId>
            <artifactId>maven-compiler-plugin</artifactId>
            <version>3.9.0</version>
            <configuration>
                <source>11</source>
                <target>11</target>
            </configuration>
        </plugin>
        <plugin>
            <groupId>org.apache.maven.plugins</groupId>
            <artifactId>maven-resources-plugin</artifactId>
            <version>3.2.0</version>
            <configuration>
                <encoding>UTF-8</encoding>
            </configuration>
        </plugin>
        <plugin>
            <groupId>org.apache.maven.plugins</groupId>
            <artifactId>maven-jar-plugin</artifactId>
            <version>3.2.2</version>
            <configuration>
                <classesDirectory>src</classesDirectory>
            </configuration>
            <executions>
                <execution>
                    <goals>
                        <goal>test-jar</goal>
                    </goals>
                </execution>
            </executions>
        </plugin>

    </plugins>
</build>
Another cool way to make your maven dependency efficient is by integrating the third-party dependencies needed for your Selenium automation project/framework by adding those to the dependencies section so that consumers of your framework don’t need to repeat those in their project pom.xml.
Once you have the necessary details in pom.xml, go to your Gitlab account and create a personal token to grant your machine/IDE access to the Gitlab project. While you create a personal token (.e.g.: name = MyPersonal_Token) by following these steps, please ensure that you have ticked the checkbox for API.
Now, we need to create a file with the name the settings.xml and need to save it in the .m2 folder (/Users/MY_USER_NAME/.m2 – It is a hidden folder, and you may need to follow the steps to unhide the folder). Windows users, please note that while saving/creating settings.xml file, you are choosing the file type as ‘All Files’ instead of ‘Text Document’. Else this file will not be recognized by Maven. Below is the basic structure of settings.xml where you need to replace MY_PERSONAL_TOKEN_VALUE_FROM_GITLAB_UI with the value you have got from Gitlab.
<?xml version="1.0" encoding="UTF-8"?>
<settings xmlns="http://maven.apache.org/SETTINGS/1.0.0"
          xmlns:xsi="http://www.w3.org/2001/XMLSchema-instance"
          xsi:schemaLocation="http://maven.apache.org/SETTINGS/1.0.0 http://maven.apache.org/xsd/settings-1.0.0.xsd">

<pluginGroups></pluginGroups>
<proxies></proxies>
<servers>
    <server>
        <id>gitlab-myframework-dependency</id>
        <configuration>
            <httpHeaders>
               <property>
                    <name>MyPersonal_Token</name>
                    <value>MY_PERSONAL_TOKEN_VALUE_FROM_GITLAB_UI</value>
                </property>
            </httpHeaders>
        </configuration>
    </server>
</servers>

</settings>
Let’s move to the final step of publishing the dependency. In your cmd/terminal go to the folder where your project is located. Then run the command – mvn deploy
Once you see the BUILD SUCCESS message in your console, you are all set. Go to the ‘Package & Registry’ menu in Gitlab where you can find the package you have just created.
If you make some code changes to your framework project and run mvn deploy again, then the content of the dependency will be updated but the version will remain the same. If you want to create a new version of your dependency then just change the version of your project at the beginning of your pom.xml file, as below, and run the mvn deploy again.
<groupId>com.tmavens</groupId>
<artifactId>UiFramework</artifactId>
<version>2.0-SNAPSHOT</version>
Importing the dependency on other projects
Now, let’s see how to access the mvn dependency of the framework in your Selenium/API projects.
As you would have created your framework project as a private repository in Gitlab, you need to give permission to other SDETs/Automation Test Engineers to the framework project (Developer level access is needed). Once access is granted, they need to create a personal token for themselves and add that to settings.xml as we have done earlier. This way, we can ensure that our framework maven dependency is accessible to only those people whom we have granted access.
Once that is done, in the pom.xml of the selenium project just add the dependency. We have chosen the classifier as tests because in the framework project, code was present in src/java/test folder and we built the dependency as test-jar.
<dependency>
    <groupId>com.tmavens</groupId>
    <artifactId>UiFramework</artifactId>
    <version>1.0-SNAPSHOT</version>
    <classifier>tests</classifier>
</dependency>
As this dependency is present in our own private repository instead of Maven Central Repository, we have to specify the location from where it can be downloaded. Yes, it is the same repository details you had given earlier in your framework project. Please add this to your selenium project pom.xml
<repositories>
    <repository>
        <id>gitlab-myframework-dependency</id>
        <url>https://gitlab.com/api/v4/projects/MY_PROJECT_ID/packages/maven</url>
    </repository>
</repositories>
Once you run mvn clean install command, the framework jar and associated third-party dependencies will be downloaded and added to your project.
Wasn’t it easy compared to integrating another build tool and maintaining your own server just for maven dependency distribution? Another advantage of integrating automation framework as a dependency instead of an external jar is that your automated CICD pipeline becomes streamlined to integrate the external java code of your framework by resolving pom.xml than looking for it in an external location. Needless to say, as your QA DevOps has improved you will be confident to run the automation suite frequently, and you can reap the benefits of improved test automation efficiency.
The example I have shown here is for the Selenium UI automation framework. But you can build an independent/shared automation framework for API automation using RestAssured or Device/Mobile automation testing using Appium where your code is based on Java, using the same process I have shown. Please let us know your feedback and reach out to us in case of any queries at [email protected].